Pages

Monday, 28 October 2013

myboshi Yarn Review


As 'myboshi' is a new product, I thought it would be a good place to start for a yarn review.  To get the legal stuff out of the way; the review below is my own opinion and the yarn from my own supply.  I have received no payment for this review, I just thought it would be a nice thing to do!  

Information on the brand
myboshi was developed by two German Skiiers, Thomas and Felix who learnt to crochet whilst at a remote ski resort in Japan.  Whilst it's gathering popularity in Europe, it's only just coming over to the UK and so it's quite hard to find much more about myboshi in English.  It's being distributed by DMC, and as well as yarn, there are crochet hooks, labels and patterns available too.

Information about the yarn
myboshi original No1 50g ~ 55m ~ 60 yds
Content: 70% Polyacrylic, 30% merino wool
Wash: machine wash, 30 degrees
Recommended hook size: 6mm, US J/10
Recommended needle size: 6/7, US 10
1 hat ~120g
Medium hat = head circumference 53-56cm
Large hat = head circumference 57-60cm
Cost: Around £4 per 50g ball


First Impressions
The colour range for myboshi is outstanding.  The 36 colours in the collection include neutrals, pastels, brights and neons and so give a modern, young, unisex feel.  The merino in the yarn makes it feel soft and warm but without looking whispy.  It's actually softer to touch than it looks.  The yarn is nice and chunky and perfect for it's intended purpose; outdoor winter hats.

Crocheting with yarn 
This yarn is pretty nice to crochet with.  It works up especially fast to make a hat in a hurry.  It's very slightly splitty, but not so much that it's problematic.  The merino/polyacrylic blend means that it has a bit of stretch in it, but not enough to loose shape.  For a chunky yarn, it was easy on the hands. I found that the patterns in the small guide were clear to follow if you've crocheted before, but would probably be tricky to follow if you were new to crochet.  I also found that I needed a fair few more rounds in order to make a long enough beanie to cover my head although this could be because I crochet very tightly.

Final thoughts
I'm a fan.  myboshi yarn gives a polished finish that means even simple stitches like half trebles (UK terms) produce a professional looking hat.  myboshi beanies are easy to make, and would be perfect as a beginner project, although the patterns aren't the clearest I've seen.  I'm sure it could be used to make scarfs and gloves easily and would make great gifts for christmas.  

Sunday, 27 October 2013

My Boshi Yarn - My New Favourite Thing!


There are three yarn shops in Great Yarmouth.  One at the end of the dodgy end of town, so rarely visited.  The other two are cute little local yarn shops, full to the brim with soft squidgy good stuff in hundreds of colours.  Whilst celebrating payday by browsing the aisles for some christmas inspired cottons, I found this:
I took this after I had raided the stash, which is why the display looks a little unkept!  
Bright colours?  Check.  Thick and chunky?  Check.  Ooooh it was everything I'd been waiting for to begin making those winter hats everyone keeps asking me to do.  I scooped up as many colours as I could hold (that's not an exaggeration, literally as many as I could hold) and made my way to the counter.  I even went back and picked up a couple of accessories for good measure.   

The owner of the shop,  Lisa, told me a little about the 'My Boshi' brand.  It's the idea of two German skiiers who learnt to crochet whilst at a remote Japanese ski resort in order to make their own beanies ('Boshi' is Japanese for 'beanie').  The guys then had their idea picked up by DMC and now it's available all over Europe.  You can read a little more about their story here although to be completely honest, most stuff I've found about it on the internet is in German.  

Now I went to town on this stuff.  The heady mix of payday and bright chunkys appears to have forced the sensible, money-conscious part of my brain to switch off so I made it home with a ginormous stash.  

 This is most of it.  There were a couple of pinks and white too.  And more grey.  I loooovvvee grey.  It just goes with everything.  A good mix of fluorescents, brights and base colours.  These three however are my absolute favourites:


I think mossy green is such a lovely colour and the photo doesn't do the bluey-teal justice.  I can't wait to use these together.  In my frenzy, I also picked up the small pattern guide and a label two pack.  The labels are a nice touch in my opinion (although I'm sure some of you will think it's a bit gimmicky).  The labels say 'Selfmade Boshi' and add a nice finishing touch to take away that homemade feel that I wanted to avoid.  The pattern book has three patterns, one slouchy hat, one beanie and one ear warmer and gives patterns for both medium and large head sizes.  Were they a bit of a rip off?  Probably.  The labels were £2! Although I've since found them on the internet for 85p for two and the patterns I probably could have worked out if I gave it a little thought.  But still, I was happy with the things I'd bought.  


I woke up early the next day and could only think of starting a hat.  I blame the fact that it was ridiculously early to account for me making the hat double the size it should have been.  I'm not really sure how I even managed it, or how I failed to notice, but when Coop eventually woke up and began questioning who's head I was making it for, I realised there was only one thing for it; it had to be frogged.  Luckily for me, this stuff works up quickly and the hat was even quicker to make when it was human head sized rather than that of a small elephant!  I should think it took less than three hours from start to finish.  

I am so pleased with how it turned out.  With such a large colour selection, it's easy to find complimentary colours that work well together.  Here it is:


 And modelled by me: (notice the glasses?  I'm rocking a 'Where's Wally?' kind of thing)


The orders for 'My Boshi' hats are already rolling in so I don't think it will take me too long to get through my stash of colours.  Even Coop, a huge clothes snob has selected his colours and requested for his hat to be made next.  Praise indeed!  

Tomorrow, I'll be reviewing My Boshi yarn so be sure to come back and take a look.

Sunday, 20 October 2013

Tangled yarn, tangled life


Oy.  What a week.  Busy at work, busy at home, on the go without a second to pause.  I'm not complaining particularly.  I like to work hard, keep myself active.  I'm not one to sit and watch life drift idly by.  But this week time has slipped away right under my nose without giving me the chance to do the things I needed to.  

The yarn knot above is a fairly good representation of how my mind feels at the moment.  A huge tangle of thoughts and 'to do' lists that haven't yet been unravelled.  I guess the only thing to do is to get right back to it... x

Sunday, 13 October 2013

Fresh Stitches Kit Club Big Reveal!


As if going to Yarndale wasn't exciting enough, the day I was driving up to Yorkshire I also received my Fresh Stitches Kit Club through the post.  I love  this idea.  Every other month, a mystery item is sent through the post.  It features a Fresh Stitches pattern, plus everything you need to make your cuddly (except stuffing) and a mystery gift to make your toy something special, more than just your regular singlet crochet.  In past kit clubs, this has included beading and working with pipe cleaners all supported on Stacey's website so you know exactly what to do with it to make sure it turns out super cute! 

As I'd enjoyed my other kit clubs so much in the past, I signed up for this year's one and waited patiently for my kit to arrive.  It's tougher than you would think; as Stacey's followers are spread all over the world, some receive their kits much before I do.  It's so tempting to snoop around on the internet to find out what's in the package, but I resisted this time, making sure it stayed a surprise right until I opened the box.  

And what a great surprise it was!


When I ripped open the box, I have to admit my first thought was "A teddy bear made from plain yarn, is that it?"  but of course it wasn't.  As I dug out all the bits and pieces I realised that tucked under the pattern was the part that suddenly made it all very fun.  Kool-Aid sachets.  Kool-Aid is particularly  exciting to me as it's not something we have here in the UK so it's been one of those things on my list of things to track down, that I never really got round to doing.  In case you haven't heard of it, Kool-Aid is a drink (!) in America, a bit like the squash we have over here.  

After Yarndale, I eagerly watched Stacey's video to get set in my mind what I needed to do, then gingerly emptied the contents of the sachets into two separate bowls; one blue, one orange.


Which didn't look that interesting until I added a bit of boiling water...


The colours were soooo vivid!  There are two packets of orange here with one blue.  And the smell!  A wonderfully sweet fruity smell filled the house once the water was added.  What I hadn't anticipated was how quickly the dye is slurped up by the yarn.  The video had warned the yarn was dye hungry as it was untreated animal wool, but wow this was fast!  Within perhaps two seconds of tentatively laying the wool in the dye mixture it was gone!  I was a bit shocked by this; I had expected to have to poke it around a bit to get it to take to the dye (I had only just finished my yarn dyeing workshop at Yarndale and was thinking of how things had taken there) so hadn't arranged the yarn quite as I might have liked.  

  
I tried adding a little bit more water to see if I could dilute the dye to make it go a little further, but as you can see any water I added had no colour.  I think this is because you use boiling water to make up the dye, it instantly sets the colour so it doesn't leak at all.  I rinsed the yarn well under cold water, but very little dye came out.  A good rinse also makes sure your yarn won't be crispy when you come to work with it, so it's worth taking a little time over it.  

After a thorough squeeze, I had to sit back and wait for the yarn to dry, so I left it hanging in my conservatory, and crossed my fingers that Squitchy wouldn't notice it was there.


I was so pleased with how it turned out!  Not only are there those really bright, bright colours, but there's also some more subtle in-between shades in there too.


It worked up really nicely, although next time I would try to think of my colour repeat a bit more.  What Ive found is that for the teddy's arms and legs, the colour repeat means that one side is really colourful whilst the other side is almost plain.  To try and alter this, I guess I would have to know how much yarn is used in one stitch for example, and then decide how many stitches I want each colour to be, to either make a repeating pattern, or completely avoiding it.  It would take a bit of planning, and to be honest, I quite like the random look!

Meet Teddy, the Bear

Teddy, the Bear didn't turn out quite as cute looking as I had hoped.  I can't quite put my finger on exactly what I'm not happy with, but there's definitely something.  I am, however, very pleased with the effect of Kool-Aid dye and I can't wait to get some more colours so I can experiment in the future.  Have you ever tried Kool-Aid dyeing?  Do you have any tips for me?


Saturday, 12 October 2013

Unbelievable things to see...

This week has been the most unbelievable week for me.  Sheldon has hit the big time and it's taken me completely by surprise.  Don't get me wrong, I think he's a cool little guy (yeah I know I'm biased but still... he's a little cutey, right?!) but when I posted a pattern link to the Yarndale forum on Ravelry I didn't expect the reaction I got.  To be completely honest, I was waiting for someone to tell me they'd deleted my post because it was cheeky of me to put it there in the first place.  

But that's not what happened.

Things went crazy!  I have been completely overwhelmed by the lovely, kind, warmhearted things people have said.  That crocheters and knitters from all kinds of places have taken the time to not only stop by and read my blog but to comment, email, like and follow things has just astounded me.  I was so worried about how Sheldon's pattern would be received; anxious about any mistakes or confusions that might be discovered but it seems I had no reason to panic.  In fact, there are a few Sheldon's already made! It has been the best feeling to see other Sheldons cropping up around the internet.  You can take a look at a couple here if you like.  Aren't they fab?!  All of this has just proven once again what a gracious, accepting community the crochet world is, and I'm so grateful to be a part of it.  


Spending so much time replying to these messages has confirmed one thing to me though.  I need glasses.  Really need them.  I used to wear glasses for work, but over time became certain that I did just as well without them.  Now however, that's not so true.  I've noticed that the laptop page is magnified a little more each time I need to read something, and at work my nose is almost bumping the screen I'm sitting so close to it!  

So today I picked up two new sparkly pairs of glasses.  Thick plastic geeky ones, as I just don't like the really normal looking ones (perhaps I can't fight the true geeky scientist in me any longer).  I'd forgotten how good things were supposed to look.   That small print on the bottom of the letter?  Read it.  The man and his dog that Sas has got his eye on in the distance?  Saw it.  People's faces on the telly?  Blur free.  All day I have been putting my glasses on and off, admiring how much clearer things seem.  I decided to settle down with a book, iced bun and cup of hot chocolate just to appreciate how much better reading is with my glasses on :)

It's going to take a while to get used to wearing glasses again, and at the moment I'm wearing them around the home so I recognise myself with them.  Maybe one day when I'm feeling brave, I'll let you see me in my new geeky glasses, but for now, it's just Coop and Sas who have seen them, and neither seems to have particularly noticed a difference!

Sunday, 6 October 2013

Loop Stitch Tutorial

The loop stitch is an easy one, but on first glance appears quite fiddly.  I thought it might be useful to make a tutorial to help you work through the stitch, so that you can go ahead and make your very own Sheldon the Sheep!


I have made both a video and photo tutorial, as I know I usually have to see both to really understand what goes where!

Photo Tutorial

The first thing to note in the Sheldon pattern is that when working the head and body, I suggest to work in the back loop only.   Why?  I'm not sure really, it's just the way I've always done it!


Step 1: Put your crochet hook through the back loop of the next stitch, and then yarn over.


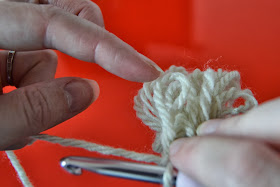
Step 2: Next, stick out your index finger that is feeding the yarn.  This makes the 'loop' of the loop stitch.


 Step 3: Can you see the yarn hanging between my index and middle finger?  Catch it with your crochet hook.

Step 4: Pull it through the first loop on the hook.  You should then have 3 loop on your hook.  

Step 5: Yarn over again.


Step 6: Pull the yarn through all three stitches.  And your done!  The loop will show on the back of the piece you are working on.  


Video Tutorial


Sheldon the Sheep


After Yarndale, my head was full of all things wooly, and what better way to commemorate the first festival than with my own tribute - Sheldon the Sheep!  This is my very first attempt at designing my own amigurumi, so please let me know if you spot any mistakes, or if anything is unclear.  

I would love to hear what you think of Sheldon - good or bad - so please leave me a comment at the bottom of the page.


Notes
Pattern written in UK crochet terms (UK dc = US sc)
All rounds are worked in a continuous spiral
Abbreviations:
dc = double crochet
dc2tog = double crochet decrease 
Lpst = loop stitch
Lp2tog = loop stitch decrease

You are welcome to make Sheldon the Sheep for gifts or to sell, but please credit the pattern back to Curly Girl Coop.

Materials
Size 6.0mm (US J) crochet hook
Safety eyes
Tapestry needle
Stuffing
Chunky weight yarn in cream (150g)
Chunky weight yarn in grey (50g)
Chunky weight yarn in black (50g)

Body (in cream)
Crochet in the back loop only.
Round 1: magic ring. (6)
Round 2: Lpst twice in each st.  (12)
Round 3: *Lpst twice in next st, lpst in next st.  Repeat from *5 times.  (18)
Round 4: *Lpst twice in next st, lpst in next 2 sts.  Repeat from * 5 times.  (24)
Round 5: *Lpst twice in next st, lpst in next 3 sts.  Repeat from * 5 times.  (30)
Round 6: *Lpst twice in next st, lpst in next 4 sts.  Repeat from * 5 times.  (36)
Rounds 7-11: Lpst in each st.  (36, 5 rounds)   
Round 8: *Lp2tog, lpst in next 4 sts.  Repeat from * 5 times.  (30)
Round 9: *Lp2tog, lpst in next 3 sts.  Repeat from *5 times.  (24)
Begin stuffing
Round 10: *Lp2tog, lpst in next 2 sts.  Repeat from *5 times.  (18)
Round 11: *Lp2tog, lpst in next st.  Repeat from * 5 times.  (12)
Continue stuffing
Round 12: *Lp2tog.  Repeat 5 times.  (6)
Round 13: Lp2tog next and 4th st, and fasten off, pulling knot to inside.

Head (in cream)
Crochet in back loop only. 
Round 1: magic ring.  (6)
Round 2: Lpst twice in each st.  (12)
Round 3: *Lpst twice in next st, lpst in next st.  Repeat from *5 times.  (18)
Round 4: *Lpst twice in next st, lpst in next 2 sts.  Repeat from * 5 times.  (24)
Round 5: *Lpst twice in next st, lpst in next 3 sts.  Repeat from * 5 times.  (30)
Rounds 6-7: Lpst in each st.  (30, 2 rounds)
Round 8: *Lp2tog, lpst in next 3 sts.  Repeat from *5 times.  (24)
Begin stuffing 
Round 9: *Lp2tog, lpst in next 2 sts.  Repeat from *5 times.  (18)
Continue stuffing
Round 10: *Lp2tog, lpst in next st.  Repeat from * 5 times.  (12)
Fasten off with long tail.

Face (in grey)
Round 1: magic ring.  (6)
Round 2: *3dc in first st, 2dc in next st, dc in next st.  Repeat from * once.  (12)
Round 3: dc in first st, 2dc in next 3 sts, dc in next 3 sts, 2dc in next 3 sts, dc in last 2 sts.  (18)
Round 4: dc in first 2 sts, 2dc, dc, 2dc, dc, 2dc, dc in next 4 sts, 2dc, dc, 2dc, dc, 2dc, dc in last 2 sts.  (24)
Round 5: dc in first 3 sts, 2dc, dc, 2dc, dc, 2dc, dc in next 7 sts, 2dc, dc, 2dc, dc, 2dc, dc in last 4 sts.  (30)
Rounds 6-8: dc in each st.  (30, 3 rounds)
Round 9: dc in first 3 sts, 2dctog, dc, 2dctog, dc, 2dctog, dc in next 7 sts, 2dctog, dc, 2dctog, dc, 2dctog, dc in last 4 sts.  (24)
Attach the safety eyes at round 8, spaced 4 stitches apart.
Round 10: dc in first 2 sts, 2dctog, dc, 2dctog, dc, 2dctog, dc in next 4 sts, 2dctog, dc, 2dctog, dc, 2dctog, dc in last 2 sts.  (18)
Begin stuffing
Round 11: dc in first st, 2dctog in next 3 sts, dc in next 3 sts, 2dctog in next 3 sts, dc in last 2 sts.  (12)

Ears
Make 2
In grey
Round 1: magic ring.  (3)
Round 2: 2dc in each st.  (6)
Round 3: *2dc, dc in next st.  Repeat from *3 times.  (9)
Rounds 4-10: dc in each st.  (9, 7 rounds).

Legs
Make 2
In black
Round 1: magic ring.  (6)
Round 2: 2dc in each st.  (12)
Round 3: *2dc, dc. in next st  Repeat from * 5 times.  (18)
Rounds 4-6: dc in each st.  (18, 3 rounds)
Round 7: *2dctog, dc in next st.  Repeat from * 5 times.  (12)
Round 8: dc in each st.  (12)
Round 9: *2dctog, dc in next 2 sts.  Repeat from * 2 times.  (9)
Stuff feet firmly
Change to grey, lightly stuff legs as you go along
Rounds 10-34: dc in each st. (9, 25 rounds)
Fasten off with long tail.

Arms
In black
Round 1: magic ring.  (3)
Round 2: 2dc in each st.  (6)
Round 3: *2dc, dc in next st.  Repeat from *2 times.  (9)
Rounds 4-5: dc in each st.  (9, 2 rounds)
Round 6: *2dctog, dc in next st.  Repeat from * 2 times.  (6)
Stuff hands firmly
Change to grey
Rounds 7-25: dc in each st.  (6, 19 rounds)
Fasten off with long tail.

Finishing
  • Attach face to head by joining to each stitch, then attach ears to head.
  • Attach legs to underside of the body. 
  • Attach arms to top of body.
  • Attach head to body.  

CONGRATULATIONS!  
You have made yourself a super Sheldon the Sheep!

I'd really like to see your finished Sheldon's so be sure to send me pictures or post to Ravelry

Saturday, 5 October 2013

Yarndale 2013 part II

This was the sight that greeted you as you walked through the door to Yarndale, and it was breathtaking; the photos don't begin to show to bright colours and individual designs that made you stop and really look. 

Having said that, we were on a mission.  A Bunch of Buttons and I had scoped out the Facebook page, Instagram and Twitter feeds of many of the exhibitors and so knew what we were looking for.  My shopping list was small; a yarn bowl from County Alpacas, some beautiful hanks from A Stash Addict and a crochet hook from For The Love of Yarn for my lovely newby crocheter, Leanne.  Of course, I had still come prepared with a purse bursting with cash, just in case...  We quickly worked our way through the things we needed (yes, needed!) as we had a busy schedule.  I had secretly booked us both into one of the many workshops that were being held in the main ring.  Our class was 'Dyeing to Have Fun', and I selected it because it's not the kind of thing we usually get up to at home.  I told Anna over breakfast, when I suddenly had a panic that she might not want to do anything but shop at Yarndale.  I had nothing to worry about; Anna was made up that I was treating her to a surprise class so promptly at 11am we took our seats.

The class was run by local crafter, Jaki Bogg who was delightfully friendly and calm considering the  hubbub of the Workshop Theatre.  
The Workshop Theatre in the Main Ring


I had never tried anything like this before and so didn't know what to expect - but I loved it!  We were mostly working with acid dyes, as well as natural and food dyes, looking at how different wool materials took to colour and how you could work the dyes.  


It was a messy business!  I had stupidly decided to wear a cream top and cardi (no idea what I was thinking when I packed given that I knew exactly what we'd be doing on Saturday!) but was especially cautious and luckily managed to keep the dye on the table and the wool.  Jaki was well prepared and had gloves, aprons, jay cloths and kitchen towel all ready for us.  


We worked with super soft merino, a complete knitting swatch, a ready made piece of wool as you would get in a skein and wool straight from the sheep!  


It was amazing to see how differently things reacted to the dye, the knitting took to the dye beautifully, whilst the unprocessed wool was much more difficult to get to the colour you wanted.


Here's the finished products.  What will I do with them?  I"m not sure, but I absolutely loved the experience of getting to try something that I would never normally consider, and it's certainly made me appreciate the expertise of the exhibitors showing their own hanks at Yarndale.

Some worked well, some not so much...
Once we'd finished the workshop, we quickly got back down to business, shopping!  There were so many beautiful, brightly coloured stalls, I loved just wondering around, giving soft merino wools a squidge and stroking the fluffy alpaca furs as you moved between stalls.  There were so many pretty items to take home.


Alpacas and angora rabbits were hanging out at Yarndale too and they were incredibly cute!


The Knit 'n' Knatter lounge was right in the centre of the Exhibition Hall and home to Lucy of Attic 24.  She had set up an incredible crocheted lounge where she would meet and greet the Yarndalers and it was quite something.


Now, I have known Anna for quite some time and there is one thing she rarely does, and that's have photos taken.  But I have never seen her this excited before.  Like many others, she was dying to meet Lucy and so we duly waited in line for our turn.  I'm not sure that I think it's a good idea to meet your heroes, just in case they're not all you thought they might be, but actually, Lucy was delightful.  It must be so difficult to make light-hearted conversation with so many people for hours on end, but she certainly made it look easy, and made you feel like she was genuinely excited you were there to meet her too.  She even agreed to a  picture with Anna, such a rare event that I must show you.


The only thing that made Anna even more excited was to see that on the table behind Lucy, right in the centre, was the goat bunting that she had made and sent in.  After spending hours telling Anna that there was so much bunting that we'd never find hers, there it was!


The day was fantastic.  I enjoyed the happy, slightly younger atmosphere and crowd at Yarndale compared to the Knitting and Stitching Show at Kensington Palace that I visited last year.  It was nice to see so many local, independent exhibitors here rather than the large commercial companies, (the number of things I now follow on Instagram and Twitter must have trebled!) although I felt that by having so many smaller exhibitors, there was less variety than I had hoped for.  That being said, I still managed to return with an overflowing shopping bag!


Overall, it was a great experience, and I'm glad we made the long old trek to Yorkshire to be a part of it.  The Yarndale organisers should be so proud of what they accomplished; I can't imagine the effort and hard work it must have taken to pull it off, but pull it off they did.  Here's to Yarndale 2014!

PS.  Keep an eye out tomorrow for my Yarndale-inspired first ever pattern - Sheldon the Sheep!